Blog

Work and where you are

I’m extremely thankful for the direction my career has taken in recent years. Both in time spent working – less time, that is – and in terms of where I do it.

Now, part of that balance has been a wonderful pivot towards church and community leadership; and to writing and publishing – but the specific type of work isn’t the focus of this thought. That said, much of it has occured in my “real” job, which happens to be medicine.

Working, whilst apparently upside down in a hammock

In the last five years, I’ve held several medical jobs that have involved “on calls” on the phone, or training in distant locations.

As a result, I often don’t have to attend a normal physical location for my work. I do need to be available on the phone, but I’m freed of a specific geographic workplace. This gives me a flexibility I’ve been under-appreciating, and an opportunity I hadn’t realised I’ve been utilising – until now.

Outside

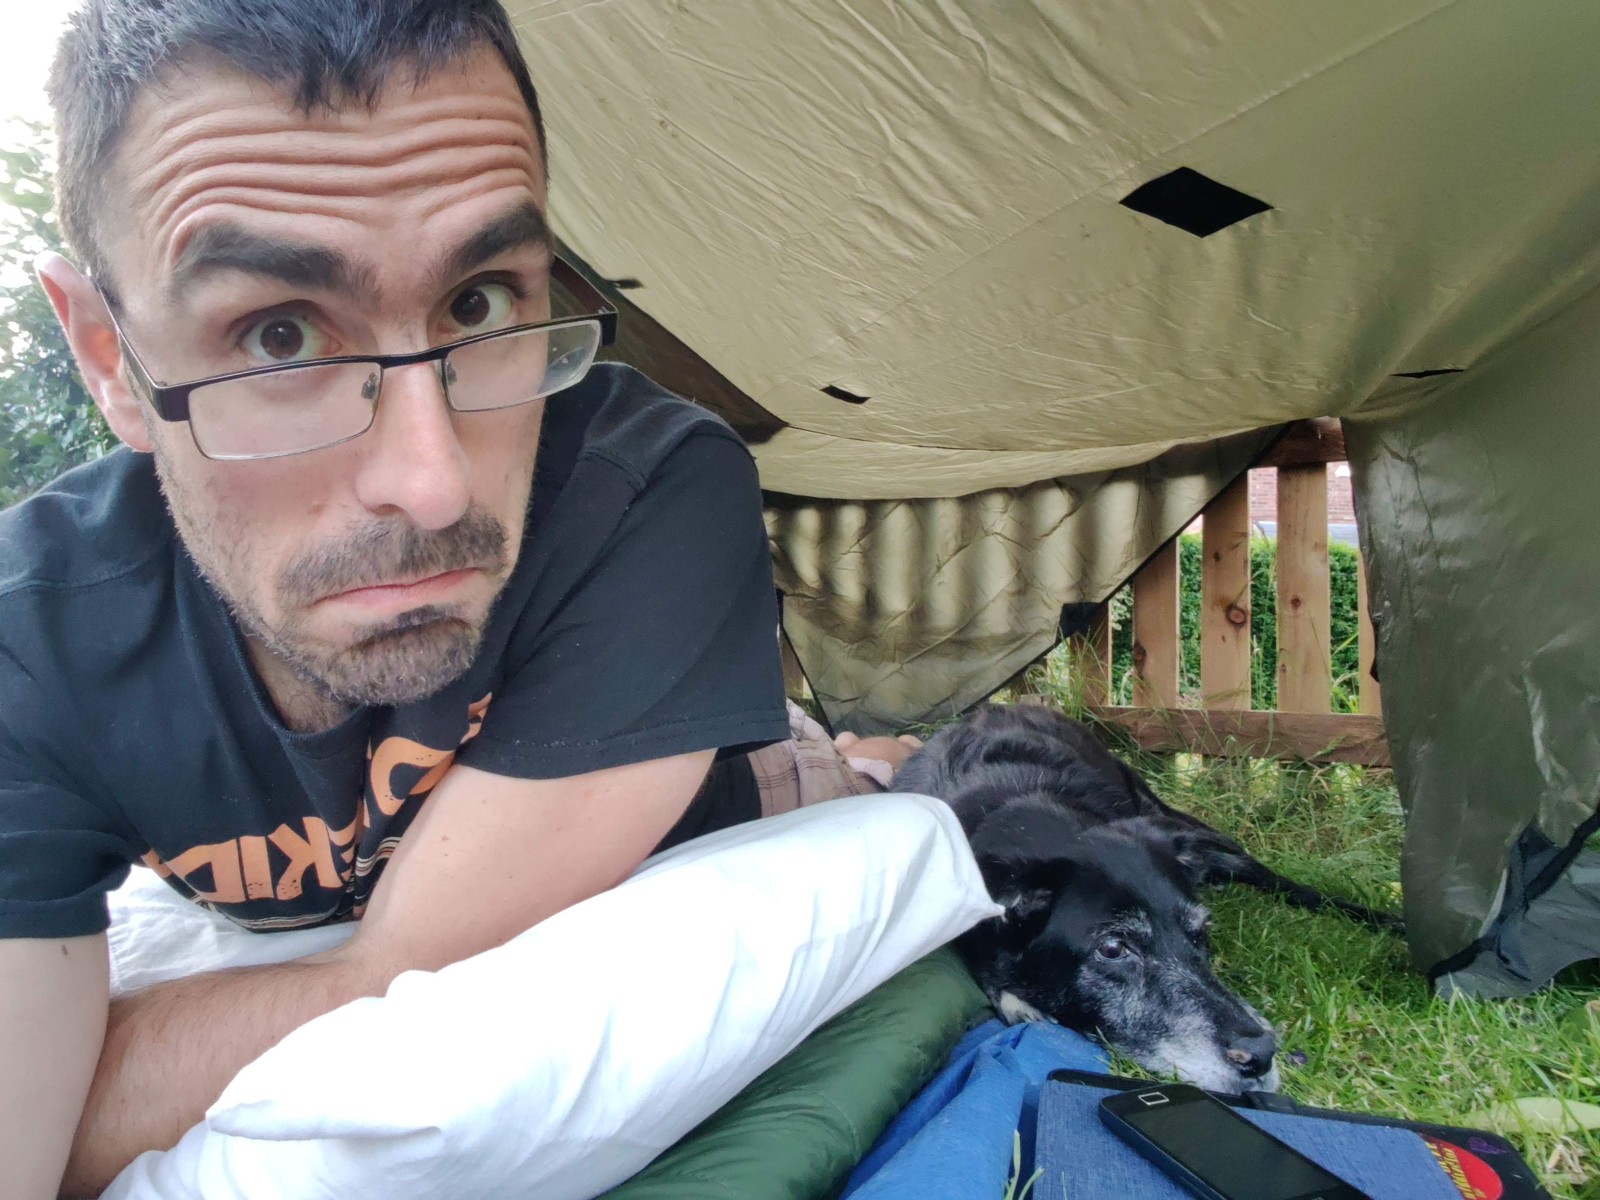
I began this post a few nights ago, whilst on call. I was laying in a hammock, in our back garden. The hour was around midnight, and above me I had a tarpaulin (a rather sturdy Eno ProFly, since you ask). I was listening to the pitter-patter of rain falling all around me. The sound of precipitation on canvas is such a there-but-for-the-grace-of-god-go-I feeling for me. The knowledge that a thin sheet is all that protects me from utter misery is somehow exhilarating, comforting and semi-miraculous.

For me, the experience is pure heaven.

The thing is, I wasn’t just doing this despite actively also working. I was sleeping in the garden because I was on call. I have to sleep in a different room from my wife due to the regular telephone calls; so I thought, might as well sleep in the garden. Without me fully realising it, my job has been creating excuses for me to sleep wild.

More than you might think

Nor was last night the first time!  During lockdown, whilst working for GP Out Of Hours, I regularly got picked up by a driver to visit care homes in the middle of the night. So I’d set up a tarp shelter, with a little wood burning stove, of course, and kip in the front garden there. I remember – on more than one occasion – a very surprised driver as I suddenly stood up when they arrived, without the front door even opening.

Another new job involved an induction at a location in Barrow-in-Furness in the Lake District. More than a little out-of-the-way, the induction involved my attendance on two separate days. I wasn’t keen to travel three hours home, and a hotel was a pricey option that didn’t appeal. So I cycled five minutes out of town and spent a pleasant night under a tarp shelter, next to a footpath.

I volunteered for a week of assistant editor at Tabletop Gaming Magazine this winter, and had a snow-laden, star-strewn 30 minute cycle to my AirBnb each night. I jogged each dawn on crisp rural roads through uneven terrain and surprise pockets of trees. Cold? Yep. Bracing? Yep. Joyful? Oh yes.

On yet another night, on a job I thankfully no longer have, I was summoned to Barrow at 11pm. I drove into the night, and finished reviewing my patient at 2am. Wandering out onto the footpath, I paused, and looked out at the sea and the hills – and took the penultimate photo below.

Where am I going with this? Well, three things, really.

Firstly, I’m aware of my privilege – but don’t write things off for yourself.

Many people don’t have the opportunity for flexible work, and I accept that. If that’s you, I’m sorry, that sucks. But also; have you asked? Have you said “I’d like to do this”, lots of times?

Look, my sleeping-in-a-bush jobs have come from a) being spurred to change – after crying one night in a car park on realising how much I disliked my job, b) talking to an absolute stranger on a train who I overheard talking about hiring people, c) giving out samples of my writing to a magazine editor I’d never met. Yes, I have had significant advantages in life, but a), b) and c) didn’t depend on those, and I wouldn’t have seen change without them.

Secondly, you are valuable. Value yourself.

Ascribe worth to the things you care about. I hate commuting, and have consistently asked for the opportunity to take the train – where I can read, write and enjoy myself – and been given permission to do so. Or just avoided distant jobs – I’ve been offered changes to roles in that direction, and said “No”.

There’ve been several times that I’ve recognised when my work has been worth more and asked for more – and recieved it! In GP Out Of Hours, I realised I wasn’t recieving holiday pay, and asked for it, and eventually had a bulk payment of the contractual 12.5% that no-one had recieved in 6 years. In another role, I was performing work from a higher pay grade and not being paid for it, so I asked for it. It took six months of persistent, escalating emails, but it worked.

The system is built on stepping on people and assuming people are too afraid to ask – the company Zoom has recently begun to enforce that its workers don’t work-from-home. Zoom?! The go to brand for making software that let’s you, you know, work-from-home! If you want change, if you want to work-from-home, or part-time, or run a project, or whatever – you’ll need to actually ask. Consistently. Over months and years, sometimes. And sometimes you’ll need to change jobs a few times, like I have. Either way, it’s worth it.

Finally, appreciate what you have.

I’m typing this at midnight, in a field in Cheshire. I can – just about – touch grass without taking my hands off the keyboard. You might not be able to do that. You might be sensible, and not want to do that. But there are undoubtably things about your employment that you appreciate – even if its purely and simply the money. Even if the money doesn’t seem like enough – at least it’s there at all. I wrote this because I’ve not really been pausing to intentionally appreciate the good stuff; so easy to moan about the bad night shift and forget the good one.

I’m deeply thankful for the positives, thankful to my life experiences and to my education and to God’s interventions that have opened doors I never thought would open. It’s good to be able to see the good, and I hope you feel encouraged to call it out in your own life.

Let’s call out the positives of where we are.


Postscript: If you read this whole post and your job totally sucks and/or you’re broke; I’m sorry. That sucks. Hope things improve, and sorry if reading this was just the worst.

Blitz Bowl Board

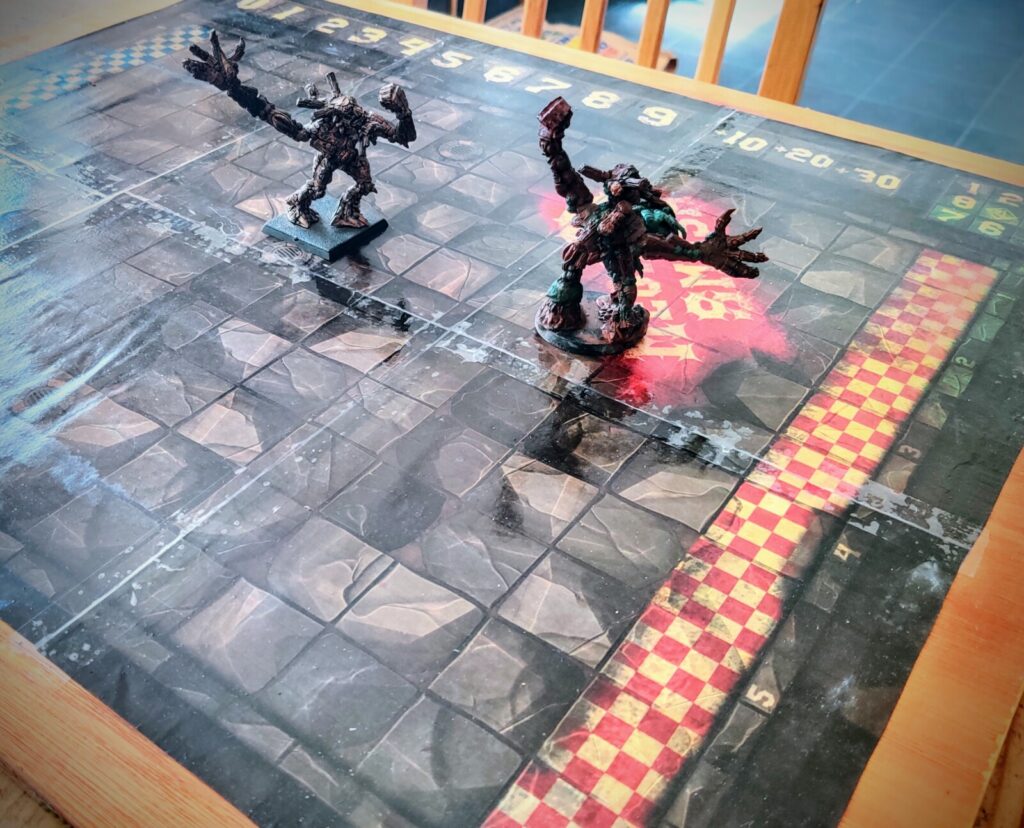
I’m an avid player of the small-team Blood Bowl variant Blitz Bowl – but its (still) not available for sale in the UK.

Which means… designing my own board!

Print your own board!

The image below has been compressed by my website
download the printable version HERE…

Feel free to download and print yourself. At some point I’ll add a print ready PDF and layered PNG, if that would be useful…

It’s designed to print on 6 A4 sheets with a little overlap and be the right size for models.

In real life

Updated this post in 2023 with some extras. Here’s a photo of it in the flesh, printed out and varnished!

And here it is with some ancient Treemen models for size. Both have huge bases, but with 32mm it all fits a dream and even with these it’s perfectly playable.

Let me know how you get on, this post has had a fair amount of interest over the last 3 years, so I’m intrigued to know if anyone made their own…

Using Markdown styles with Affinity Publisher 2

Many of us like to write in Markdown when writing draft work. It allows you to work without complicated formatting but still apply styles such as bold or italic. This is done using tags like # to denote titles or surrounding phrases with * to denote bold, italic or bold italic.

Unfortunately, Affinity Publisher doesn’t (currently) support importing files in Markdown. However, it’s the work of a few minutes with search and replace and the correct terms. Here’s how to import Markdown and still keep all your styles.

1. Save your Markdown file as filename.txt.

(Publisher won’t import *.md). You can just rename it with a .txt extension in the file manager if you want..

2. Import into text frame.

Select an empty text frame, go File > Place… and select the file.

3. Get rid of double spaces.

Markdown uses double spaces to make a new paragraph, Publisher does that automatically. Go to Text > Find and in the dropdown with the magnifying glass, select Special Characters > Paragraph Break. Do this twice in Find and once in Replace, so that double spaces become single.

5. Set everything to Body.

This ensures that everything that doesn’t end up formatted with something else has a base paragraph style of “body”. Feel free to use a different base if you prefer. Sometimes text frames can be weird and set everything imported to the last style you used – this step prevents all your text being paragraph styled as Heading2 or similar. 

  • Use Ctrl+Alt and then select “Body” in the Text Styles dialog.

5. Turn on Regular Expressions.

This is the magic you need to make our searches work. Go to the Settings Cog > and tick Regular Expression for both the Find and Replace inputs.

6. Replace Headings.

Markdown uses “# Text” to make Titles. The more # marks, the smaller the size of the title. So “### Title” will be a small Heading 3, and “# Title” will be a large Heading 1. Replacing in reverse order with #### tags before ### will prevent high level tags being picked up and classed as the lower tag with a “#” in the free text.

  • Find “\#\#\#\#\s” and replace with “$1” and set Formatting > Paragraph Style > Heading 4. This will find the “#### ” (the /s picks up the space between the letters), and change the style whilst deleting the hash marks:

Do the same with the other tags in the order below:

  • Find “\#\#\#\s” and replace with “$1” and set Formatting > Paragraph Style > Heading 3.
  • Find “\#\#\s” and replace with “$1” and set Formatting > Paragraph Style > Heading 2.
  • Find “\#\s” and replace with “$1” and set Formatting > Paragraph Style > Heading 1.

All your Titles should have appeared now like so:

8. Replace Bold & Italics.

Our regular expression this time will search for asterisks * and select the text between them. Again, do this in reverse order to catch *** first, then **, then *:

  • Find “\*\*\*([^\s].+?)\*\*\*” and replace with “$1” and Format > Character Style > Strong Emphasis.


Do the same for Bold and Italic:

  • Find “\*\*([^\s].+?)\*\*” and replace with “$1” and Format > Character Style > Strong.
  • Find “\*([^\s].+?)\*” and replace with “$1” and Format > Character Style > Emphasis.

It should now look like this:

8. Replace Bullets.

You’ll need to repeat this for every level of bullets you have, from *** to *.

  • Find “^\*\*\*\s(.*$)” and replace with “$1” and Format > Paragraph Style > Bullet 3

Do the same for Bullet 2 and Bullet 1

  • Find “^\*\*\s(.*$)” and replace with “$1” and Format > Paragraph Style > Bullet 2
  • Find “^\*\s(.*$)” and replace with “$1” and Format > Paragraph Style > Bullet 1

9. Replace Numbers

Numbered lists in markdown are done manually rather than automatically. Hunting for them involves searching for a number and a fullstop at the start of a line – so it might break things if that has been done at the start of a line but not actually intentionally in a numbered list.

  • Find “^[\d]+\.\s(.*$)” and replace with “$1” and Format > Paragraph Style > Numbered 1.

Finished!

That’s all for now! At some point I’ll make some kind of macro to do it automatically, but there isn’t capacity in Publisher for this at the moment. Shout out to Regexr – a live Regex playground which helped me understand Regex for the first time in a decade of using it – for helping me put this together!

The above, step by step, takes about two minutes. I’ve included it below again without explanation so you can just whizz through it;

  1. Set everything to “body”
  2. Get rid of double spaces. Go to Text > Find and in the dropdown with the magnifying glass, select Special Characters > Paragraph Break. Do this twice in Find and once in Replace, so that double spaces become single.
  3. Turn on Regular Expressions. This is the magic you need to make our searches work. Go to the Settings Cog > and tick Regular Expression for both the Find and Replace inputs.
  4. Find “\#\#\#\#\s” and replace with “$1” and set Formatting > Paragraph Style > Heading 4.
  5. Find “\#\#\#\s” and replace with “$1” and set Formatting > Paragraph Style > Heading 3.
  6. Find “\#\#\s” and replace with “$1” and set Formatting > Paragraph Style > Heading 2.
  7. Find “\#\s” and replace with “$1” and set Formatting > Paragraph Style > Heading 1.
  8. Find “\*\*\*([^\s].+?)\*\*\*” and replace with “$1” and Format > Character Style > Strong Emphasis.
  9. Find “\*\*([^\s].+?)\*\*” and replace with “$1” and Format > Character Style > Strong.
  10. Find “\*([^\s].+?)\*” and replace with “$1” and Format > Character Style > Emphasis.
  11. Find “^\*\*\*\s(.*$)” and replace with “$1” and Format > Paragraph Style > Bullet 3
  12. Find “^\*\*\s(.*$)” and replace with “$1” and Format > Paragraph Style > Bullet 2
  13. Find “^\*\s(.*$)” and replace with “$1” and Format > Paragraph Style > Bullet 1
  14. Find “^[\d]+\.\s(.*$)” and replace with “$1” and Format > Paragraph Style > Numbered 1.

Making Loud & Balanced Podcasts

Producing a podcast is often a fairly simple thing to do, but I used to have issues with them being much too quiet. Here are my tips and techniques for doing it well. I use Reaper in the examples below, but any DAW (Digital Audio Workstation) suite will have similar processes and features…

Enjoy this post? Check out the podcasts I run over at the Beyond Cataclysm micro-publisher…

This Book I Read… is a sort-of-book-review podcast, featuring interviews with authors about their own work, and a book that has stuck with them, for good – or bad – reasons…

What Is Roleplay? is a beginner friendly look at the world of roleplay games, and the exciting world of fun, friendship and imagination they entail.

Normalising Tracks

Example of a clipped sound file from Wikipedia (by Gutten på Hemsen, CC BY-SA 4.0 , via Wikimedia Commons)

This is always a sensible step to take, even before you do any editing.

What this does is makes the entire clip as loud as possible, without it clipping. Clipping is where the digital soundwave gets too big, and gets chopped off, which can sound distorted or broken.

That’s just good for working more clearly with the audio you can see, as the preview will be nice and full, and should mean that all speaking tracks are roughly the same volume as each other which helps when balancing them with each other as you edit and then finalise your mix.

1. Select all the sections of your recording (Select all items in a track by double clicking the Track Control Panel on an empty bit – go to FX, go down and double click the empty grey just under it. Then, Right click any segment > Item processing > Normalize items.

2. This brings up a dialog box with some options.

3. Peaking at -2db just gives you a little bit of head room – if you peak at 0db, it will hit absolutely maximum volume, any effects you add or fiddling that makes it louder will cause it to distort.

4. You definitely want Normalize items together (common gain), otherwise every segment will be adjusted to different values and will be very uneven.

Compression

Compression, for those who don’t know, squashes every piece of sound above a certain level, by a ratio. What that does is it reduces the difference between loud and quiet. A sudden laugh, rather than being twice as loud as talking, ends up 50% louder, for example, which is more comfortable and less jarring to listen to.

Setting up basic compression on a track is pretty easy.

1. Click “FX” in the Track Control Panel, and a dialog will appear:

2. Select ReaComp, and you have a scary set of dials. Don’t stress. You really only need two of them at a basic level.

  • Threshold is the volume above which the compression kicks in
  • Ratio is how much it squashes audio above the threshold

3. Press play on your audio, and the threshold will fill with green. Drag the marker to just above where it gets to during quiet talking.

4. The idea is that only louder talking/shouting/laughing gets compressed. I would set the ratio at around 2, to have a mild but useful effect. Going much above 4 can make things sound very sudden and flat.

5. Below you can see one that I set up, with the red guage showing how much the compression is kicking in.

6. (Pro tip, you can always set up multiple compressions, with a second one with a higher threshold and higher ratio, so that the really loud sounds get squashed even more. I do that in the next section.)

Master Effects

Once I’ve basically finished editing, and compressed and EQ’d my individual tracks, I’m ready to export. Before I can do that though, I set up the following effects on the Master track:

  1. ReaEQ
  2. ReaComp
  3. ReaComp
  4. ReaLimit
  5. Loudness Meter

1. My EQ is set as a High Pass Filter. Basically it allows high frequencies through, but, in this case, cuts off anything much below 50Hz. Humans can’t hear below 20Hz, and it can cause earbud speakers trouble, and muddy the sound between different voices and various problems. There’s no downside to putting one on, and often a few benefits.

2. I then set two Compressions, one with a 2.0 ratio and one with 4.0 ratio , with the 2.0 coming on with loud talking, and the 4.0 just rarely stepping in on very loud bits.

3. A Limiter (I use ReaLimit) is like an UberCompressor – it boosts the volume to a level, but also guards it firmly – anything that crosses the line is squashed like a pancake; hence the term “Brickwall”. The reason for this is that it’s better to have ‘flattened’ sounding volume peaks to ones that are distorted and clipped. Clipping is a big risk because we are boosting the volume as we adjust the threshold.

4. I set it with a Brickwall of -0.3, giving just a tiny bit of room above it, and a Threshold (the amount it boosts the volume by) to a point where the limit is only reached very occasionally, like the screenshot below. You need to press play and just watch a bit for that.

5. Finally, the Loudness Meter gives a guage of how loud your recording is ending up at.

6. All the podcast providers recommend different volumes – around a LUTS value of 14 to 16. Ours here is -12.5, which is a smidge too loud, but tells us we aren’t miles off course – But we will be adjusting it in our export anyway, as we export…

Exporting

1. Go to File > Render, and you get another weird dialog box.

2. The important bit here is Normalize/Limit…

3. Set the LUFS-I value to -14, which should keep most podcast platforms happy, and you are good to go!

4. (Here’s the final render dialog, which shows it finished the job at exactly -14.0)

Dominations; Road To Civilisation

Establish an epic empire before your enemies.

Ever wondered who would win out between the Babylonians and the Huns? The Romans and the Ancient Egyptians? Dominations: Road to Civilisation lets you find out. 

It’s a tight-yet-sprawling game that gives 2-4 players the opportunity to take control of a simple tribe and spin them up into a great Nation. Players compete on a central geographic board, placing triangular dominoes, planning out competing Mastery Card technology trees and battling to build classic architectural Wonders of legend. Even as these challenges consume your concentration you also have to focus on fulfilling individual objectives and winning out on the highly important Influence tracker.

If the convoluted paragraph above makes Dominations sound like a meaty beast, that’s because it is. Playtime on the box is 80-160 minutes, which is… not true. I’ve played it multiple times now, at counts from 2-4 players, and it’s reliably landed at 3-4 hours each time. That’s not a criticism – sometimes what you really want is a medium-heavy Eurogame, full of crunchy decisions and with just enough player interactions to keep you constantly alert. In those moments? Dominations is absolutely the game for you.

Each game is split into 3 Ages, with 5 turns in each. That gives a measured pace to each playthrough, and keeps planning painfully tight. The core of the game is actually relatively simple: score your objectives. The steps to achieving that form the framework for success, but involve prethought from the very first moments. As an example, with just 15 turns, the objective “Own 11 cities” means that you need to build a city during all but 4 of your building phases. Get into Act 2 without considering your objectives, and you might as well not have started.

The key, as with many of the titles in this genre, is to make your actions work for you as much as possible, achieving one, two or even three of the mini-milestones that pave the way to victory. Mastery cards stack, potentially one earning you bonus green Knowledge whilst another reduces how much green Knowledge is needed to buy green cards. The long game is everything; building Influence pays out nothing immediately, but gives a bonus card and Victory Points at the end of each Age. Decisions, decisions!

The worst moments of Dominations are those when you can’t quite pull all the threads together, when the options available to you don’t feel particularly useful or efficient. At those times there’s a feeling of everything slipping through your fingers, especially as you observe your opponents chaining together mastery cards, or gaining knowledge points off the back of your own hard-earned city growth. However, with little randomness here, it is almost always your own fault for landing in that position – a (painful) learning point for future plays.

Bonus credit to creators Holy Grail Games for possibly the best included game organisers we’ve ever seen in a game; this is a rare 4 hour game that can be set up in 4 minutes rather than 40. On the downside, almost all the included Kickstarter exclusive mini-expansions were either totally forgettable or so unbalanced as to break the game; we would recommend you mostly ignore their existence. (NB. There are several full release expansions available too, Dynasties, Hegemon, Provinces & Silk Road, which we haven’t played yet, but suspect will be much better balanced).

A final way that Dominations excels is in the scale up to four players; neither play length or complexity are badly affected. The nature of complex, specific games is that there is always a risk of analysis paralysis; but the brain challenge is at a level that the information is calculable without causing catatonia, and it’s rare that other players will hinder your planning. This means that most thought can happen before your turn, keeping the game ticking at a reasonable rate regardless of player count.

Chris Lowry

PLAY IT? MUST PLAY

Dominations is one of the best titles we’ve played this year. It’s always a good sign when you finish a 3 hour game and immediately want to play it again. Balancing all the components of the puzzle is extremely satisfying, but impossible to perfect; the joy here is found in repeated play.

TRY THIS IF YOU liked Agricola…

…Euro classic Agricola shares a clearly measured paucity of turns, but also involves aggressive blocking of actions by other players. With much less opportunity for malicious interactions, Dominations is clearly competitive, but less likely to make you hate your opponents. Such a deliciously fast setup time is the cherry on the cake.

A review I’ve written for Tabletop Gaming Magazine. Copyright and rights TTG Magazine 2022.

Chris is running the London Marathon

Sponsor me below (please)!

Its been a rough 3 years…

I started training for this marathon in January 2020. I’m FINALLY running it in October 2022.

I’ve done 429 hours (18 days!!) of practice runs, covering 4,363km during that time. (About the same distance as running to Nigeria).
On our recent family holiday to Disneyland, I ran every day, for around an hour, on the boring ring-road around the resort. (This was still better than actual Disneyland).
There have been bleeding nipples, chafed thighs and utter physical exhaustion. On some of the 3 and 4 hour training runs I had to be alone, with no one to talk to, for 4 hours. Can you imagine the pain this causes an extrovert?

Help out a bit

All money donated helps children in the developing world through a charity Chris and Katherine helped set up many years ago: Names Not Numbers Charity.
They provide orphans and vulnerable children with food, shelter, medication and love. Its worth it.
Did you get me a birthday present this year? Thought not. Now’s your chance.

The Die Decides has arrived!

What’s that? You wrote a book?

That’s right. Much of 2021 involved writing and illustrating “The Die Decides“, and releasing it on the wonderful Beyond Cataclysm publishing house.
You can buy it here…

Intriguing.

A book you say?

Why, tell me more…

What if the course of an entire book was decided by rolling a ten sided die?

Journey with author CM Lowry as he seeks to find out, with this vibrant collection of pin-sharp, bitesize stories.

Feast on fiction as he takes you from satire to sci-fi, from robots to revolutions, from historical drama to horror – and more, in thirty three portions.

Every tale is tailored to a theme and length determined by the roll of The Die, and each piece has been individually illustrated, bringing the many worlds of CM Lowry into life.

Read on, for a multitude of adventures, and together, let’s find out what The Die Decides

Visit BeyondCataclysm.co.uk to buy a shiny new copy of The Die Decides!